Friday, 29 June 2018

One Step at a Time.

It's funny how life twists and turns sometimes.  You can think you are going in a certain direction and all of a sudden you are not going that way, you are going this way instead.  Sometimes it's hard to understand and be sure of why those changes occur and how to make the best decisions.
Our life has recently taken a turn and we find ourselves temporarily in another city.  We are doing our best to be flexible and available and present in the moment.

While we are here I have been able to spend some time at the ocean.  I can just sit there and look and absorb the beauty.  It's relaxing and calming and soothing.


Sometimes we have a chance to explore the city.  We wander around and just look.  For my husband, Darrell, who grew up here, it is nostalgic and a time of reminiscing.  We like taking our books and enjoying the library.  


I've been practicing gratefulness and looking for beauty.  It is not hard to find beauty in this city so that makes it pretty easy most days.  

I continue to work on my small business and have created a few new play mats to feature in my Etsy shop.  If you are interested in having a closer look you can find them here.


Unicorns and Peg Dolls.


Meadows and horse paddocks.


I've also made two ocean mats and a "make way for ducklings" mat which was inspired by the pond in the garden where my mother in law and auntie live.

I guess for today, I needed to be here.  To write a few words, to gather thoughts, to share my journey in a small way.

The twists and turns of life can overwhelm at times, but by taking one small step at a time, by trusting (for me, I put my trust in God, Jesus and the Holy Spirit), and by enjoying the beauty around, the path can become clear and illuminated.

Monday, 5 February 2018

A Wood House Play Invitation.


One of my husband's favorite ways to spend his time is in his workshop.  He originally built the workshop as a base for his carpentry business.  He also wanted to fulfill his childhood dream of building his family a house.  His workshop has been a busy place throughout the years. 


 He finds it hard to throw things out just in case he might need it, but things were getting a little unorganized and cluttered. He has been doing a lot of organizing and cleaning and sorting these days. 

 Perfect timing for me and my little business, and the carrot came up, which features a variety of children's toys. He has partnered with me and cuts out tree cookies and blocks, builds art caddy's, sensory tables, easels and all sorts of fun items!  


This is a little house he cut from a chunk of local old growth fir.   It's thick and heavy and would go perfectly in a child's block area.  The door goes right through the block and on the side is a round window that also goes right through the other way.  He sanded the edges so they are soft and I finished it with some Tung Oil.


It is fun for me to add embellishments that invite a child to come and take notice and play.  Materials that provoke imagination and creativity.  


Schleiss Brand animals are my favorite but of course, any animals would work just as well.  I absolutely love scouring garage sales and thrift stores for just the right treasures!


This little kitty is just waiting patiently for that little mouse to come down.  


I think the little mouse isn't in a hurry....


Monday, 29 January 2018

DIY Light Table for Infants and Toddlers.

My handy carpenter husband Darrell, made a homemade light table for our infant and toddler room.  Someone donated a train table that was the perfect height and a nice size for the little ones to use.  We also had some plexiglass that was donated.


Darrell fastened a strip of wood around the inside of the table near the top, for the plexiglass to rest on.  The plexiglass is in two sheets but that doesn't really impact the finished product at all.


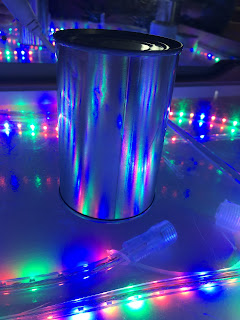
We had a colorful light cord at the center already and decided, for now, to use it inside.  We could still install a light bulb with a switch and might choose to do that in the future but for now, we are using the light rope as it is doing the job!


Darrell drilled a hole for the cord in the corner of the table.


We plugged it in and easy peasy, we have a really nice light table with very little cost involved. The children wasted no time playing and exploring with loose part materials on the light table.


We are experimenting with using tissue paper, parchment paper or cellophane paper to obscure the light somewhat as it is quite bright.  If you scroll back to the top you can see in the first picture that shows half of the light table has parchment paper and the other half does not.  


Then I  tried taping some paper hearts on the underside of the plexiglass and that works to diffuse the light.

 For additional reflection, I added a mirror to the wall behind the light table.


We are quite pleased with the results and the littles are playing with it daily.  I think it's quite magical with the light rope shining on loose parts and the height is perfect for this age group allowing them to reach what they need.

We are trying to follow the children's lead in our classroom through observation and interactions.  I wonder what changes will happen next on the light table?


Saturday, 13 January 2018

Felting Play Mats - Inspiration and Design.

As some of you know, I have started a small business selling handcrafted children's toys.   It's a small business, just right for the time and energy I have to invest in it.  I am experimenting with different venues for selling, such as my own, and the carrot came up Etsy shop, markets, local buy and sells on Facebook, and occasionally through a provincial Childcare support program.  I have to say that I'm thrilled with the results so far and absolutely loved buying Christmas presents for family out of my little account!  

A friend recently asked me where I get the ideas for my play mats.  Do I follow designs or make it up as I go along?

It just so happened as I was messaging with her that I was, in fact, partway through the design of a new ocean mat.  I had recently sold an ocean play mat through my Etsy shop so I wanted to replace it.  All of my mats are unique and one of a kind!  

One of the ways I stay inspired is to create from images I have in my mind of places I seen or been. Places that I have fond memories of. I happen to live in a forest and I love the pallet of color as the sun shines through the trees, and onto the mushrooms, and fallen trees with moss and bark.  As well, when I visit the ocean I am always drawn to the ever-changing color of sea and sky.  I am constantly on the lookout for treasures on the beach whether it be sticks or stones, beach glass or shells.

At times I am inspired by a story such as Owl Babies by Martin Waddell.  I like to pair a story with a play mat, as it gives the user a starting point for storytelling and also for imaginative play.  If using a play mat as a basis for storytelling is unfamiliar it helps to have some ideas of what props could go with the play mat.  As a childcare provider, I often use the stories at a gathering time and later will set the play mat up in the room for the children to play with.  I am currently in a daycare room with infants and toddlers mixed and we have several play mats that they have used from time to time.  They might need a little support to engage their imagination but even at a very young age, they are capable.  For this young age, we usually have animals, wood pieces or fabric that work nicely with the play mats we have.  As children get older, they can use many more loose part items to enhance their play and in fact, the play mat is often just a small part of the play.  It is foundational though as it creates a scene or small world from where the play can start.


The very first thing I do when creating a play mat is to arrange the batting or the base of my play mat in an appealing shape.  I also make sure that the thickness is even throughout the piece. I might needle the base to hold it in place.  If you hold it up to the light or window you can see where any weak spots are and fill that in a bit more.

Then I start with the roving and let the color inspire me.


I really loved the pink, purple and white in the ocean this time.


Have you noticed how sand on the beach also varies in color from place to place?  Of course, sometimes it is mostly rocks and driftwood as well.


I love adding a bit of silk to embellish and accentuate the waves.


I was definitely inspired by Stella Star of the Sea, by Marie Louise Gay for this play mat.  My grand-daughter has loved this story through the years and we re-read it again this Christmas together.  It's really lovely, in my opinion.


I add in detail comes after all of the foundational colors are in place.  Different colored stones and a little kelp is what I was going for here.


This purple starfish is a memory from a family trip to Oregon a few years ago.  We actually thought it was dead at the time as the tide had gone out, it was stranded and it wasn't moving.  And then it did move and so we put it in a tidal pool and were happy when we saw it move.


When all of the details are in place I get down to the actual wet-felting process.  As this play mat is fairly large it took me about an hour and a half to felt it well.  I use hot water, soap (not dish soap) and friction!  I usually use my hands but also use this textured rolling pin.  You could also use bubble wrap.  


When it is dry I add or touch up some details or parts that I feel need it with my needle and then voila! The project is complete.


I always hope that these little creations of mine find their way to a happy home where a child can play and imagine and learn and think!  I recently got some positive feedback from someone who gave one of my play mats to her daughter for Christmas and she was thrilled and therefore I was thrilled!  It just made my day to hear that she was happy and the play mat was being used.

Celebrating and Promoting imaginative play for children.