Wednesday, 20 November 2019

Learning New Skills.

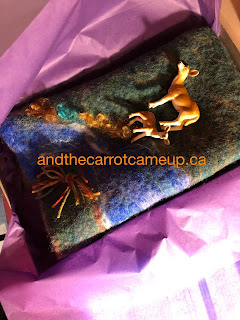
My most recently created play mat, the one featured in the series of blog posts I wrote to share how I design and fabricate a play mat, has sold.  I couldn't be more thrilled as I got to meet the lovely April who purchased it and hear about her Family Childcare business.  I love when I know the play mats are going to a good home and I hope that much story telling and imaginative play will happen with it.


I am super excited that my small business has expanded somewhat with the purchase of a few key tools.  A scroll saw, a belt sander and a dremel sander.  With these new tools I can start cutting out my own wooden animals and finishing them easily with the various sanding tools.

I am learning to cut wood and can't wait for my days off work to spend a little time in my husband's workshop to cut a few more little critter's.  At this point I'm experimenting with different kinds and thicknesses of wood and also with different patterns.


I recently met Oana Nistor on Instagram.  You can find her @story_baskets and she is being mentored by Susan Munzer and sharing Susan's work with story telling.  Through Oana I got permission from Susan to use her patterns from one of her books, Learn to Play, Play to Learn.  

Susan said, I could use the patterns with the condition that  they would, "honor and develop young minds."  That is something I definitely hope to contribute too through my work.

Susan also said, "A good idea is only a good idea if it is shared with others."

I'm excited to launch out to learn a new skill that I think will lend itself well with the felted play mats and small worlds I like to create.


I'm experimenting with different types of finish as well and have tried acrylic paint, mod podge, water color and bees wax.  Please comment if you have experience to share with me.   I would appreciate hearing from you.


This is one little girl who thinks that cutting out wooden animals and painting them is a good idea! My sweet little grand-daughter who is getting big way to quickly, worked so hard on all her pieces to give away as Christmas presents.


Saturday, 2 November 2019

Using your Play Mat: Creating a Play Mat - Part 5


Hi Everyone!

Here we are for the final post where I will share various ways that you can use your completed play mat!

Being as this one was a forest play mat you might like to think of ways that you can incorporate real nature pieces onto it such as leaves, pine cones, chestnuts, and wood or anything that you can forage.  


Looking closely at leaves can lead to discussions on color, shape, species, and parts such as veins and stems.  Maybe the children would then like to use leaves on the art table to trace, rub, paint, draw or color.

You could hid an insect under neath and talk about how they are looking for a warm place to spend the winter.  This could lead into a greater discussion on hibernation.  Maybe you would like to add some white wool or cotton batten for the children to add as the snow comes. 


Play a memory game.  Place 2-4 insects under the leaf, ask the children to close their eyes and remove one.  Can they figure out which one is missing?


Add in a set of forest story stones.


Study and learn about pond/stream habitat. Who lives there?  Add a bridge and a troll and tell the story of the billy goats gruff.  

  
Add in some peg dolls and tell a make up story of some of their adventures in the forest.  Could that piece of drift wood be a boat and add some excitement to their outing?


Add in forest animals such as bear, fox, deer, raccoons, skunks, moose, elk etc.


Add in real or hand made flowers and other foliage like bracken or dried grasses and offer those in various places in your home or daycare room.


 Add in tree cookies.


Provide fences, take away the woodland animals and add farm animals.
  

Is winter coming on near you?  Add in snowy mountain blocks.  Or add a back drop that could be as simple as fabric or a fall/winter scene from a calendar.  A mirror is also stunning as a backdrop and really adds depth and reflection to the small world play scene.


Go for a walk through the forest or if you don't live near one plan to go to a park and especially look for chestnut trees or acorns and leaves and cones to bring back.


You can plan specific story telling times like a gathering/circle time and incorporate the same animals or characters from the story.  You can make up a story.  Once upon a time their was a beautiful forest and in the forest lived a.......and so on.

Observe how the children play and what they are interested in and extend their play by providing props and other items that can keep the play going strong.  Let them lead!  They know what they want and need to learn about. They will likely inspire you with their own fabulous ideas!

Depending on the age of the children they can have full use of a small world like this, however keep in mind that young learners might still be mouthing toys so provide bigger materials for them. Your play mat could be used on a nature table for display/observation purposes.  Add in all those lovely nature pieces and hang a branch above for some birds to hang on or maybe you make a nest!

I hope that you have found this tutorial on creating and using your play mat helpful.  Please message me if you have any questions!  I love facilitating workshops where we could make a play mat together and even some accessories!  As well I sell lots of the items above at market tables or you can contact me about that as well.  I am working on setting up my own online shop but have some items in my Etsy shop.  


Have a happy week-end!


Wednesday, 23 October 2019

Embellishing your Play Mat: Creating a Play Mat - Part 4

Hi everyone! 

Today I am going to share with you some of the ways that I embellish my play mats.  To be honest, the sky's the limit with how you finish your play mat  because creativity is unique and personal.  

I like to think about what inspired me in the first place and also how I think the play mat might be used and by whom.

In this case I was going for a forest and autumn inspired mat and so I will continue on with that in mind.

One of the things I love as I walk through my woods is the little surprising splashes of color that happen as leaves and bushes begin to change.


Using my needle I add simple tiny bits of merino roving.  


Here I was loving the last of my marigolds before the frost.


I needled in some curly mohair locks and added some wool.  The wool is hand sewn on and reinforced on the back with some batting.  In my experience, young learners can be very curious and like to try and pull on bits that stick up!

That's all I added.  It is possible to wet-felt a bit more if you really want those colorful bits to stay on but I have found needling is pretty durable.  I am working in a toy library and am discovering some play mats that I made about 12 years ago and other than some pilling they are in pretty great shape.  I did re-felt one and it come out like new!  So they can endure a lot of handling if felted well in the first place.

While I was taking these pics I realized I need to do one more blog post on ways that you can use your new play mat.  I couldn't resist adding in a few animals right away.

Watch how the small world becomes alive!


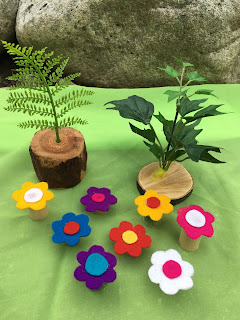
Add in nature.  Rocks, wood, leaves, pine cones.  Add peg dolls.  Add movable flowers.


Have fun!  Take time to play!

Image result for take time to play for adults quotes


Friday, 18 October 2019

Wet-Felting a Play Mat: Creating a Play Mat - Part 3

I am in my happy place at last! In my art studio.  I had a good work week but I was dreaming about finishing this play mat and have been looking forward to getting back to it.

I have to apologize on the outset for less than stellar pictures of the process I use to wet-felt my play mats. My kitchen causes shadows and it's hard to get great lighting, there was only me and selfies are not my strong suit!

I hope you can follow along though, and we will get right into this next stage of the tutorial.  I am assuming that you are happy with the layout of your raw wool and committing to the design so far.  

Layout your plastic and place your project onto it.  You will want to get some very hot water ready. I usually boil the kettle and mix it with hot water from the tap so that it's hot but not too hot to handle.  


This is the soap I am going to be using and I cut off a piece to put into my watering can and also a piece for me to use for rubbing.


Sprinkle your play mat liberally with the hot water, keeping in mind that wool naturally resists water.  It does take some experience to know how much water to use to thoroughly wet your project.  I usually know that when it is pooling on the plastic around the edges that I have too much and I just drain that off.  So the idea is enough water, but not too much.  It's a tricky part but comes more clear with practice.  Really there is no harm done with too much water but what can happen is the fibers can't join together as they are floating apart so you may notice that your mat is not felting.  The reason I use a watering can is for the sprinkle feature.  It distributes the water nicely.


Once the wool is wet cover the whole piece with your plastic and gently, but not tightly, tuck in the edges to help contain your water.


Make a puddle of water for yourself on top of the plastic, soap up your hands and press firmly onto the wool.  I like to press down to release air and to help move the water around to make sure the whole project is wet.


Using both hands begin rubbing.  I like using circular, inward motions so that I'm not stretching the wool away from itself. Apply as much pressure as you can as the friction is necessary.  Some people use a rolling pin and others use bubble wrap all things that cause friction and help the process of felting along. You will find what works for you.

 I will usually rub until the water is cool. You don't want to be lifting the plastic at this point as it can disturb the fibers that are just beginning to felt together.  When your water is cool or after about half an hour of rubbing you can roll up your mat including the plastic and drain off the cold water.  Make sure you just squeeze the water out and don't twist or wring the wool.


Maybe you can see in the next picture that my wool mat is starting to felt and looks fuzzy.  It's all good!  Add some more hot water and repeat with more soap and rubbing.  I suggest it's good to think happy thoughts, listen to music or a podcast at this point as you have to put the time in for wool to transform to felt.


It's coming along nicely I think.  Less fuzzy now and starting to ripple.  Some people do not love the feeling of rubbing directly onto the wool. You can felt the entire project with the plastic covering.  I like to eventually remove the plastic and work right on the wool itself.  It helps me see the areas that need a bit more work.  You can also turn your piece over and felt on the backside which helps that felting process also.


I changed the water several times and probably worked on it for an hour to an hour and a half.  When you think it is done,  you can rinse it in the sink running it under hot water, then cold water, then hot water again.  You can knead it as you rinse it as that helps to continue the felting process.


This was the final result after laying it flat to dry overnight.

 The next stage of this project is to embellish my play mat and add details using my needle.  

Stay tuned!


Sunday, 13 October 2019

Designing a Play Mat: Creating a Play Mat - Part 2

Hi everyone!  Happy Thanksgiving!
I am thankful for many things today.  It's been a reflective, quiet day at our house and some of my thoughts have been heavy and sad and then I got working on this project.  I feel more balanced again.  It's nice to keep the hands busy and be able to process thoughts at the same time!

I am here on the blog today,  to share how I design a felted play mat.  Some of you have seen my playmats/small worlds on "and the carrot came up" facebook page and many of you have bought them through my Etsy shop or at a market table.  I am so thankful for the encouragement that gives me to keep putting my art out there and I am beyond thrilled that there are small children benefiting from using these natural "toys" for stories and play.

Many of you have taken a workshop with me and the feedback I received from you is that you would like a tutorial.  While I am not comfortable, at this time, to go "live" I can share the steps in written form.

First, I gather the materials I need.

1) I use a red or burgundy felting needle. I use the WizPik brand and will give my sources for all the materials I buy, at the bottom of this post.  This needle is carbon steel and is about 3-3.5 inches in length.  It is perfect for this kind of felting.  You can also purchase tools that have multiple needles in them.  I have one that holds three needles and a punch tool that holds five.

2)  I have a piece of foam to needle felt into.  There are eco-friendly options out there.  If you like to sew you can make your own bag from burlap and fill it with rice.  I use foam because when I first learned to felt that is what was presented at the time and I am still using the same one almost 10 years later.  I would probably like to try the rice method at some point.

3)  I use batting for the base of my play mats.  Because children are often using them I use 3 layers.  That makes the play mats really strong, thick and durable.

4)  I have a wide range of colorful roving for the surface of the play mat, that I use for detailing.  This is where your creative juices can flow!

5)  For the wet-felting part, I use a large plastic garbage bag that has been cut in half, some lovely goat's milk or aloe vera soap, and a watering can.

In my last blog, I talked about being inspired by an idea before you start your play mat.  I am usually inspired by nature and that is evident by the playmats I make which are usually a patch of earth, depicting farmland or forest and often including ponds or streams. I love creating ocean playmats too. 

I am going to share some pictures of a simple playmat that is in progress and hopefully you will see the steps I take clearly enough to make your own!

I want to share that while felting a play mat there are often "ugly duckling" stages that the wool creation goes through while in the designing process.  What I have learned after making many, many playmats is the felt is very REPAIRABLE.  Even after you have felted your mat you can fix little things that didn't turn out quite how you imagined.  As I took pictures of this "in progress" play mat, I saw things that I went in and changed.  I am going to share the picture before I changed it though, to show a bit of my thinking and creative process.

First, the inspiration.  On one of my walks through my forest, I was yet again amazed by all the shades of green.  As it is fall, there are also gorgeous splashes of yellow,  reds, and golds.


Building my playmat.  Three layers of batting, with the top layer being the color of the forest. I usually pull the batting off the role and go with a fairly random shape.  Some people like their edges to flow out, I like to tuck mine in with my needle.  


Adding splashes of color.


Adding the different wool colors is like watercolor painting.  I like it best when they flow together, meld and complement each other.  Again, I look to nature for inspiration and try to have a combination of random and organized beauty!


The picture below is the whole mat in very rough, beginning stages.  While I liked the colors on the edges, I ended up taking off the colors in the middle because I decided to go back to my initial inspiration which was all of the shades of green I was seeing on my forest walk.  So, I took off those bits of yellow and rust and added in more shades of green.  I will probably make more changes still.


Still working on it, but showing you how you can change things along the way.  I can tell you that I will also blend those yellow bits on the left so that they flow better.  Sometimes it helps to walk away and then come back at it with fresh eyes.


Here are a few really close up shots of the colors together.


Some people just lay out their colors and felt them as is.  I like to use my needle and join the fibers somewhat before I wet felt.  I find this gives me a better idea of what is going to happen to the final product.  I am almost always surprised anyway and that's always fun for me.

I hope you have been able to follow the process to this point!  I will continue to tweak my piece until I am satisfied with it. 

Mine is one version.  The internet being what it is, has many sources and ways to felt.  There are lots of ways to be successful in this process.  I want to encourage you to try!

 Next time on the blog we will wet felt the playmat!

Please comment with any questions!  

P.S. Look who showed up while I was taking pictures outside.  More inspiration for when the playmat is finished!


*************************************************
Sources: